FAQ
What are validations and how do they work?#
Documents can have validations to check a number of things. In most cases these validations are used to make sure required fields are filled, but they might also validate other things, like validating you have the correct number of entries in a section, or warning you if you insert too much text on some field since it might not fit in the website.
These validations are run whenever you make a change to a document. When a validation fails, it might result in a warning or an error. A warning has no consequences, it's just there to guide you. An error will prevent you from publishing an invalid document.
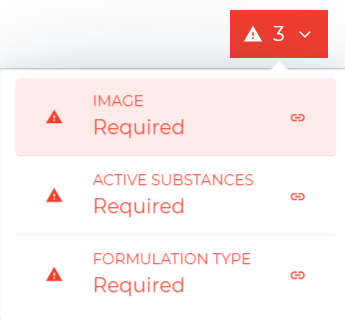
One way to know if your document has validation errors is to check the top right corner of the document page. If you see a red sign with a exclamation mark, it means you have errors in your document. If it's gold instead of red, then you only have warning, not errors.
If you click on the sign it will show you which fields contain errors and what those errors are. You can click these messages to be redirected to the field in question.

If you are clicking on the error sign and nothing happens, you've stumbled upon a known bug. Click here to see how to work around it.
You can also know which fields have validation errors by noticing that the same exclamation mark appears on the right side of the field.

What is a slug?#
A slug is an identifier of a document and has a few requirements: it must be unique between documents of the same type, and use only lowercase letters, numbers and dashes (-).
One of the most common usages of slugs are to create the URLs for the documents (e.g. if a product has the slug folpec-50, the product page will have a url like https://ascenza.xx/products/folpec-50). This means the slug should be readable and representative of its document since:
It's a lot easier for the user to understand where the URL https://ascenza.xx/products/folpec-50 leads to than this one that uses just a numeric slug: https://ascenza.xx/products/6257;
It can help you optimize the website's SEO. Search engines don’t only take into account the content of your web pages; they also look at your URLs and other metadata to draw their conclusions on what web pages are the most relevant according to what a user searched;
You can automatically generate a slug based on your document's title by using the button below. You can also write it yourself or adapt the generated one (e.g. to make it shorter).
important
If you decide to write the slug yourself, remember the requirements mentioned above.
What are Group documents used for (e.g. Product Type Groups, Crop Groups, Problem Groups)?#
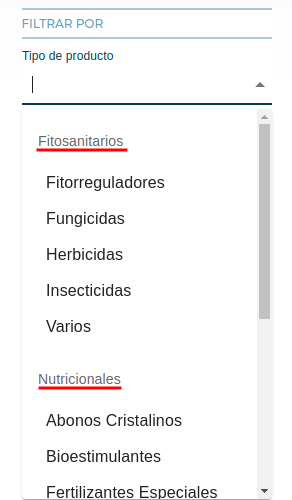
Group documents can be used to group some product filters (e.g. Product Types, Crops, Problems) in the dropdown box that appears when a user clicks a filter (see image below).

For example, if you want your crops filter to appear grouped, create a few Crop Groups and associate each Crop document to one of these.
note
If all Crop documents reference the same Crop Group, the group name won't appear in the dropdown box. This allows you to opt out of grouping altogether.
How is the Resources Page structured?#
The Resources Page is organized in three main sections:
- Articles and Files
- Videos
- Links
Articles and Files Sections#
Articles & Files Sections, as the name implies, are organized into two types of sections. You can have as many Articles Sections and Files Sections as you want (including none).
If you want to add an article/file to a previously created section, follow these steps:
- Choose the section you want to add the document to;
- Scroll to the Articles/Files field and click on Add;
- Choose the document you want from the list;
If you want to create a new section:
- At the Articles and Files Sections click on Add;
- Choose the type of section you want;
- Give it a title and a slug;
- In an Articles Section you can also give the section an Introduction text and decide if the section will only be showing the articles titles as links (instead of ).
- Click on Add;
- Choose the document you want;
tip
You can reorder the sequence in which the sections appear in your website by using the Icon and move the section where you want it to be.
important
Before you add an article or file to a section, be sure it has been created first. To do this, go to Resources, choose the type of document you want to create and click on the button to create a new one.
Videos Section#
This section exists only as a reminder that the videos shown in the respective section of the website are the ones added in the Resource Video document list, organized by creation date.
Links Section#
The Links Section is organized in groups. If you want to add a link to an existing group, follow the steps:
- Click on the group you want to add a link to;
- When a new window appears, click on Add;
- Use the arrow on the right side of the field and choose a link from the list;
If you want to create a new group of links:
- At the Links Section click on Add;
- Give a name to the group;
- Click on Add;
- Use the arrow on the right side of the field and choose a link from the list;